In today's data-driven world, the ability to leverage real-time data for machine learning applications is a game-changer. Two key players in this field, Striim and Google Cloud with BigQuery, offer a powerful combination to make this possible. Striim serves as a real-time data integration platform that seamlessly and continuously moves data from diverse sources to destinations such as cloud databases, messaging systems, and data warehouses, making it a vital component in modern data architectures. BigQuery is an enterprise data platform with best-in-class capabilities to unify all data and workloads in multi-format, multi-storage and multi-engine. BigQuery ML is built into the BigQuery environment, allowing you to create and deploy machine learning models using SQL-like syntax in a single, unified experience.
Real-time data processing in the world of machine learning (ML) allows data scientists and engineers to focus on model development and monitoring, instead of relying on traditional methods where data scientists and ML engineers used to manually execute workflows and code to gather, clean, and label their raw data through batch processing, which often involved delays and less responsiveness. Striim's strength lies in its capacity to connect to over 150 data sources, enabling real-time data acquisition from virtually any location and simplifying data transformations. This empowers businesses to expedite the creation of machine learning models and make data-driven decisions and predictions swiftly, ultimately enhancing customer experiences and optimizing operations. By incorporating the most current data, organizations can further boost the accuracy of their decision-making processes, ensuring that insights are derived from the latest information available, leading to more informed and strategic business outcomes.
Prerequisites
Before we embark on the journey of integrating Striim with BigQuery ML for real-time data processing in machine learning, there are a few prerequisites that you should ensure are in place.
- Striim instance: To get started, you need to have a Striim instance created and have access to it. Striim is the backbone of this integration, and having a working Striim instance is essential for setting up the data pipelines and connecting to your source databases. For a free trial, please sign up for a Striim Cloud on Google Cloud trial at https://go2.striim.com/trial-google-cloud
- Basic understanding of Striim: Familiarity with the basic concepts of Striim and the ability to create data pipelines is crucial. You should understand how to navigate the Striim environment, configure data sources, and set up data flows. If you're new to Striim or need a refresher on its core functionalities, you can review the documentation and resources available at https://github.com/schowStriim/striim-PoC-migration.
In the forthcoming sections of this blog post, we will guide you through the seamless integration of Striim with BigQuery ML, showcasing a step-by-step process from connecting to a Postgres database to deploying machine learning models. The integration of Striim's real-time data integration capabilities with BigQuery ML's powerful machine learning services empowers users to not only move data seamlessly but also harness the latest data for building and deploying machine learning models. Our demonstration will highlight how these tools facilitate real-time data acquisition, transformation, and model deployment, ultimately enabling organizations to make quick, data-driven decisions and predictions while optimizing their operational efficiency.
Section 1: Connecting to the source database
The first step in this integration journey is connecting Striim to a database that contains raw machine learning data. In this blog, we will focus on a PostgreSQL database. Inside this database, we have an iris_dataset table with the following column structure.
This table contains raw data related to the characteristics of different species of iris flowers. It's worth noting that this data has been gathered from a public source, and as a result, there are NULL values in some fields, and the labels for the species are represented numerically. Specifically, in this dataset, 1 represents "setosa," 2 represents "versicolor," and 3 represents "virginica."
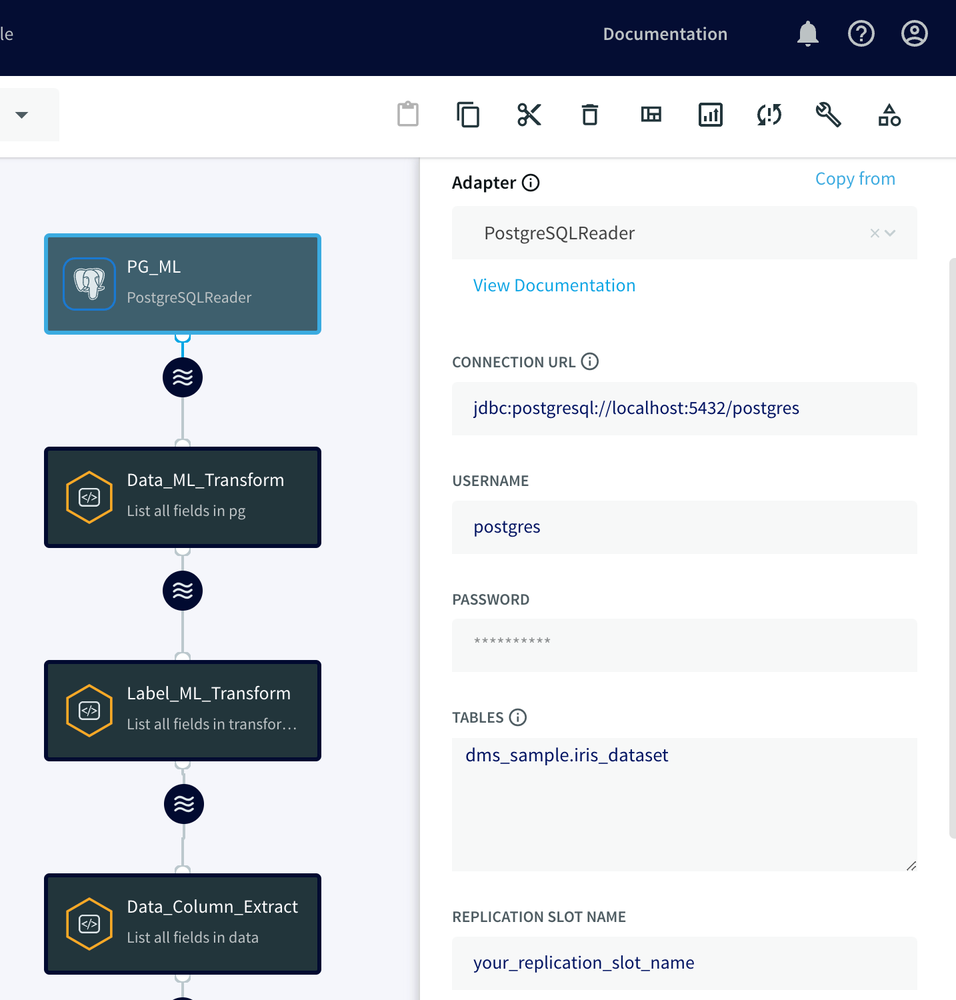
To read raw data from our PostgreSQL database, we will use Striim's PostgreSQL Reader adapter, which captures all operations and changes from the PostgreSQL log files.

To get the PostgreSQL Reader adapter created, we will drag and drop it from the Component section, provide the Connection URL, username, and password, and specify the iris_dataset table in the Tables property. The PostgreSQL Reader adapter utilizes the wal2json plugin of the PostgreSQL database to read the log files and capture the changes. Therefore, as a part of the setup, we need to create a replication slot in the source database and then provide its name in the replication slot property.
Section 2: Creating Striim Continuous Query (CQ) Adapters
In the context of Striim, CQ refers to continuously running queries that transform data in-flight by using Striim queries, which are similar to SQL queries. These adapters can be used to filter, aggregate, join, enrich, and transform events.
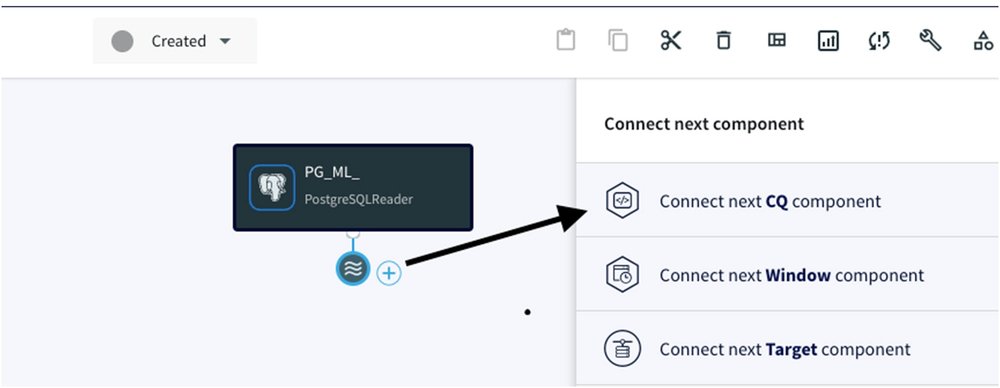
This adapter plays a crucial role in this integration, as it helps transform and prepare the data for machine learning in BigQuery ML. In order for us to create and attach a CQ adapter under the previous adapter, we have to click on the 'Wave' icon and '+' sign, then select 'Connect next CQ component':
We will now walk you through the steps of writing SQL-like queries in the CQ adapters and how Striim transforms the data in-flight once we read it from the Postgres database.
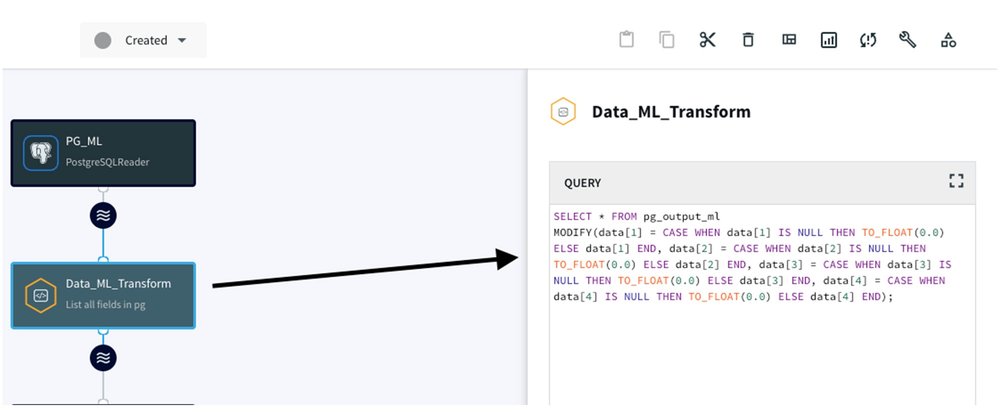
1. Handling NULL Values:
We build a CQ adapter that transforms NULL values into a float 0.0, ensuring the consistency and integrity of your data. Here's the SQL query for this transformation:
We will attach the PostgreSQL Reader adapter to this CQ for seamless data processing:
2. Converting numeric species classes to text:
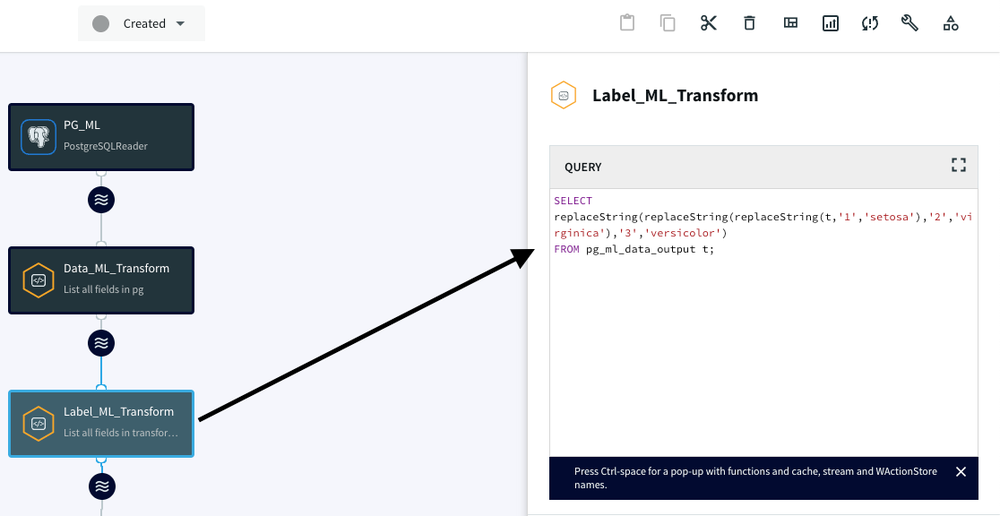
We build another CQ adapter to convert numeric species classes to text classes, making the data more human-readable and interpretable for the ML model.
We attach the Data_ML_Transform CQ adapter to this CQ for label processing:
3. Data transformation:
Finally, we create the last CQ adapter to extract the final data and assign it to variable/column names, making it ready for integration with BigQuery ML.
We attach the Label_ML_Transform CQ adapter to this CQ to assign data field to variables:
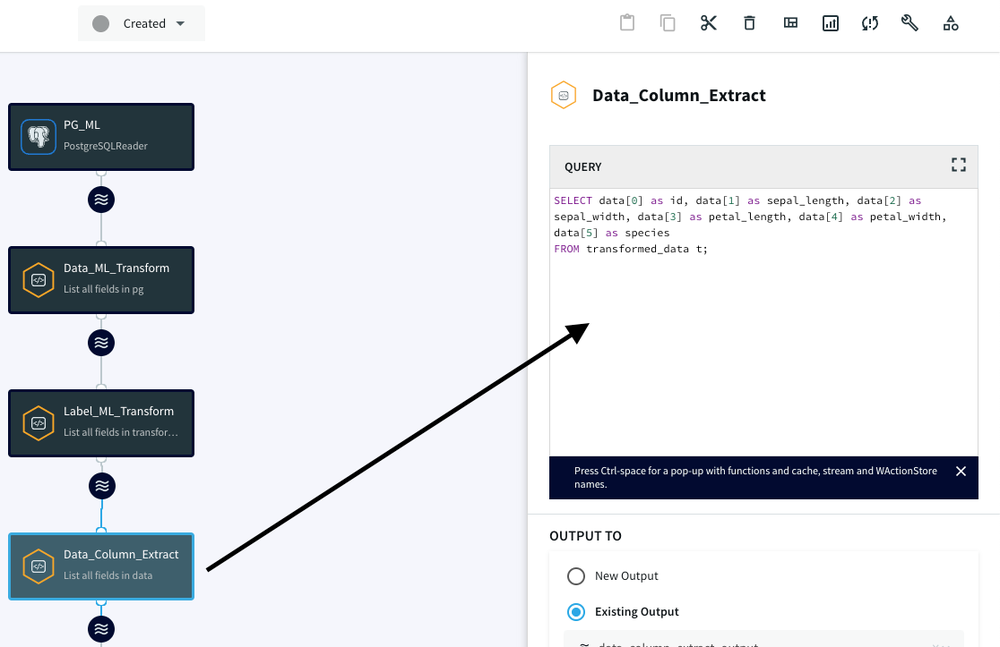
Section 3: Attaching CQ to BigQuery Writer adapter
Now that we've prepared the data using CQ adapters, we need to connect them to the BigQuery Writer adapter, the gateway for streaming data into BigQuery. By clicking on the ‘Wave’ icon, and attaching the BigQuery adapter, you establish a connection between the previous adapters and BigQuery.
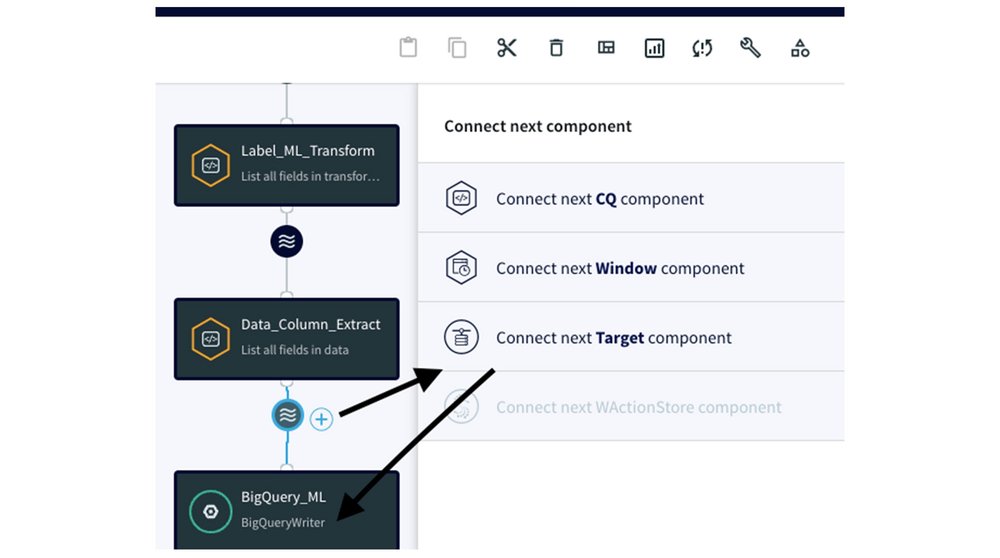
In the Tables property, we use the ColumnMap to connect the transformed data with the appropriate BigQuery columns:

To complete the BigQuery Writer adapter setup, you need to create a service account in your Google Cloud account. This service account requires specific roles within BigQuery (see BigQuery > Documentation > Guides > Introduction to IAM > BigQuery predefined Cloud IAM roles):
bigquery.dataEditor for the target project or dataset
bigquery.jobUser for the target project
bigquery.resourceAdmin
For more information, please visit this link.
After we create the service account key, we specify the Project ID and supply the Service Account Key JSON file to give Striim permission to connect to BigQuery:

Section 4: Execute the CDC data pipeline to replicate the data to BigQuery
To execute the CDC data pipeline, simply click on the top dropdown labeled as 'Created,' select 'Deploy App':
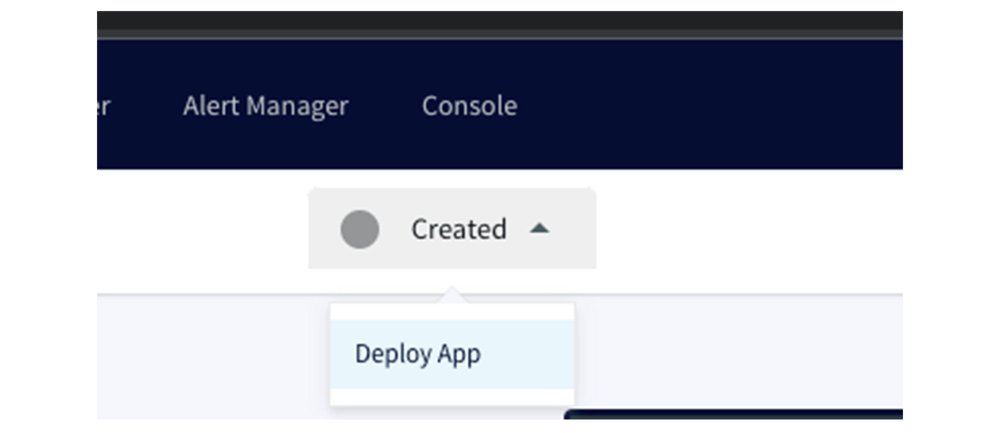
and then choose 'Start App' to initiate the data pipeline:
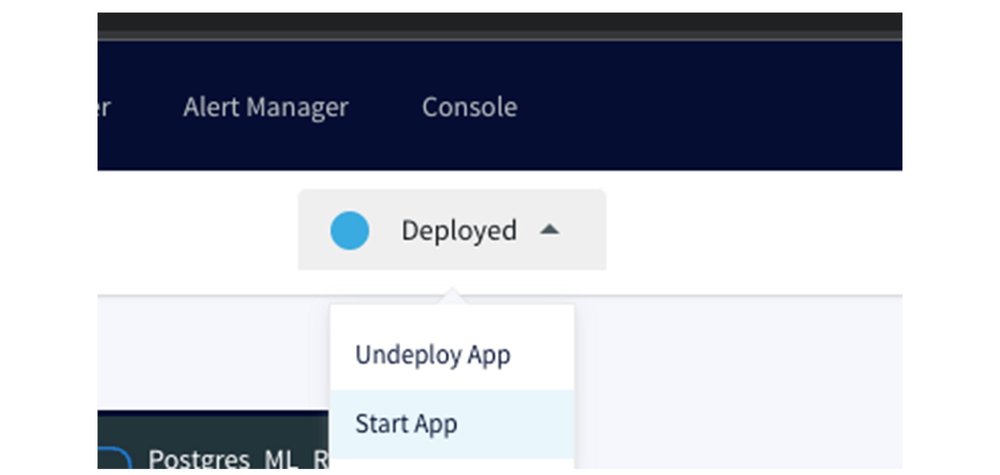
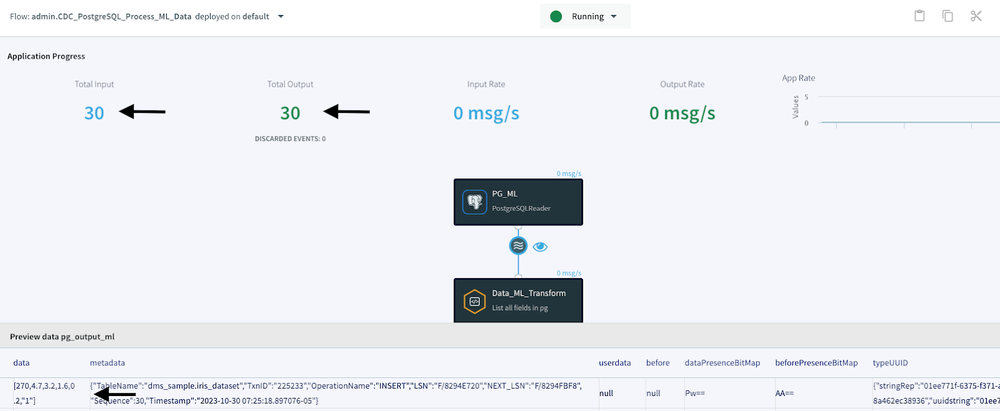
After successfully executing the CDC data pipeline, the Application Progress page indicates that we've read 30 ongoing changes from our source database and written these 30 records and changes to my BigQuery database. At the bottom of the Application Progress page, you can also preview the data flowing from the source to the target by clicking on the 'Wave' icon and then the 'Eye' icon located between the source and target components. This is one sample of the raw data:
This is the processed data after undergoing the CQ transformations. Please observe how we transformed the NULL value in the petal_width to 0.0 and changed the numeric class '1' to 'setosa' for the species.
Section 5: Building a BigQuery ML model
With your data flowing seamlessly into BigQuery, it's time to harness the power of Google Cloud's machine learning service. BigQuery ML provides a user-friendly environment for creating machine learning models, without the need for extensive coding or external tools. We provide you with step-by-step instructions on building a logistic machine learning model within BigQuery. This includes examples of model creation, training, and making predictions, giving you a comprehensive overview of the process.
- Verify that the data has been populated correctly in the BigQuery iris_dataset table. Note that 'ancient-yeti-175123' represents the name of our project, and 'DMS_SAMPLE' is the designated dataset. It is important to acknowledge that individual project and dataset names may vary.

2. Create a logistic regression model from the iris_dataset table by executing this query:

Logistic regression is a statistical method used for classification tasks, making it suitable for predicting outcomes with possible values. In the context of our iris dataset, logistic regression can be used to predict the probability of a given iris flower belonging to a particular species based on its features. This model is particularly useful when dealing with problems where the dependent variable is categorical, providing valuable insights into classification scenarios.
Here's a breakdown of what this query is doing:
CREATE MODEL IF NOT EXISTS: This part of the query creates a machine learning model if it doesn't already exist with the specified name, which is `striim_bq_model` in this case.
OPTIONS: This section defines various options and hyperparameters for the model. Here's what each of these options means:
- model_type='logistic_reg':Specifies that you are creating a logistic regression model.
- ls_init_learn_rate=.15:Sets the initial learning rate for the model to 0.15.
- l1_reg=1:Applies L1 regularization with a regularization strength of 1.
- max_iterations=20:Limits the number of training iterations to 20.
- input_label_cols=['species']:Specifies the target variable for the logistic regression, which is 'species' in this case.
- data_split_method='seq':Uses a sequential data split method for model training and evaluation.
- data_split_eval_fraction=0.3:Allocates 30% of the data for model evaluation.
- data_split_col='id':Uses the 'id' column to split the data into training and evaluation sets.
AS:This keyword indicates the start of the SELECT statement, where you define the data source for your model.
SELECT:This part of the query selects the features and target variable from theiris_datasettable, which is the data used for training and evaluating the logistic regression model.
- id, sepal_length, sepal_width, petal_length, petal_widthare the feature columns used for model training.
- speciesis the target variable or label column that the model will predict.
In summary, this query creates a logistic regression model namedstriim_bq_modelusing theiris_datasetdata in BigQuery ML. It specifies various model settings and hyperparameters to train and evaluate the model. The model's goal is to predict the 'species' based on the other specified columns as features.
3. Evaluate the model by executing this query:

Evaluating the performance of an ML model is a critical step in gauging its effectiveness in generalizing to new, unseen data. This process includes quantifying the model's predictive accuracy and gaining insights into its strengths and weaknesses.This query performs an evaluation of the machine learning model calledstriim_bq_modelthat we previously created. Here's a breakdown of what this query does:
SELECT * FROM ML.EVALUATE:This part of the query is using theML.EVALUATEfunction, which is a BigQuery ML function used to assess the performance of a machine learning model. It evaluates the model's predictions against the actual values in the test dataset.
(MODEL ancient-yeti-175123.DMS_SAMPLE.striim_bq_model, ... ):Here, you specify the model to be evaluated. The model being evaluated is namedstriim_bq_model, and it resides in the datasetancient-yeti-175123.DMS_SAMPLE.
(SELECT * FROM `ancient-yeti-175123.DMS_SAMPLE.iris_dataset):This part of the query selects the data from theiris_dataset, which is used as the test dataset. The model's predictions will be compared to the actual values in this dataset to assess its performance.
In summary, this query evaluates thestriim_bq_modelusing the data from theiris_datasetto assess how well the model makes predictions. The results of this evaluation will provide insights into the model's accuracy and performance.
4. Now, we will predict the type of Iris based on the features of sepal_length, petal_length, sepal_width, and petal_width using the model we trained in the previous step:

In the screenshot above, you can see that the `striim_bq_model` provided us with information such as the predicted species, probabilities for the predicted species, and the feature column values used in our ML.PREDICT function.
Conclusion
Integrating Striim with BigQuery ML enhances the capabilities of data scientists and ML engineers by eliminating the need to repeatedly gather data from the source and execute the same data cleaning processes. Instead, they can focus solely on building and monitoring machine learning models. This powerful combination accelerates decision-making, enhances customer experiences, and streamlines operations. We invite you to explore this integration for your real-time machine learning projects, as it has the potential to revolutionize how you leverage data for business insights and predictions. Embrace the future of real-time data processing and machine learning with Striim and BigQuery ML!
Refer to this link to learn more about what you can do with Striim and Google Cloud.
We thank the many Google Cloud and Striim team members who contributed to this collaboration, especially Bruce Sandell and Purav Shah for their guidance during the process.
 11 months ago
70