Spanner has emerged as a compelling choice for enterprises seeking to address the limitations of traditional databases. With the general availability and increasing popularity of Spanner PostgreSQL dialect, there is growing interest in migrating from PostgreSQL to Spanner. Migrating from a PostgreSQL database to Spanner (PostgreSQL dialect) can bring significant benefits, including:
-
Horizontal scalability
-
Strong consistency
-
99.999% availability offering
-
Familiar syntax and semantics for PostgreSQL developers
-
Elimination of maintenance tasks like VACUUMing, tuning shared buffers and managing connection pooling
While the benefits of Spanner are undeniable, migrating a production database can be a daunting task. Organizations fear downtime and disruptions to operations. Fortunately, with careful planning and the Spanner Migration Tool (SMT), it is possible to migrate from PostgreSQL to Spanner with minimal downtime.
The complete migration process is in the official guide. This blog post demonstrates a minimal downtime migration of a sample application.
1. Configure source (PostgreSQL) and destination (Spanner) resources
Follow this guide to create a Cloud SQL for PostgreSQL database (named example) and this guide to set up a destination Spanner instance.
2. Set up sample application
This demo migration will be performed using Cloud Shell. Launch Cloud Shell and authenticate:
The sample app is available in github:
This app works with a schema of three tables: singers, albums and songs. It performs periodic data inserts, to simulate a production like traffic.
Configure the app to connect to PostgreSQL. Gather the instance's connection name from the Cloud SQL instance overview page. Assign the correct values below and run:
Start the dockerized application:
This should insert records into Cloud SQL PostgreSQL. After verification, stop the application:
3. Configure SMT
Follow this quickstart guide to launch SMT’s web UI and connect to Spanner by entering project-id and instance-id created in step#1.
To allow SMT to connect to the PostgreSQL database, follow this IP allowlisting guide.
To Connect to source Database, enter:
-
Hostname: PostgreSQL instance’s Public or Private IP
-
Port: 5432
-
PostgreSQL Database Name: example
-
Spanner Dialect: PostgreSQL

4. Configure and migrate schema
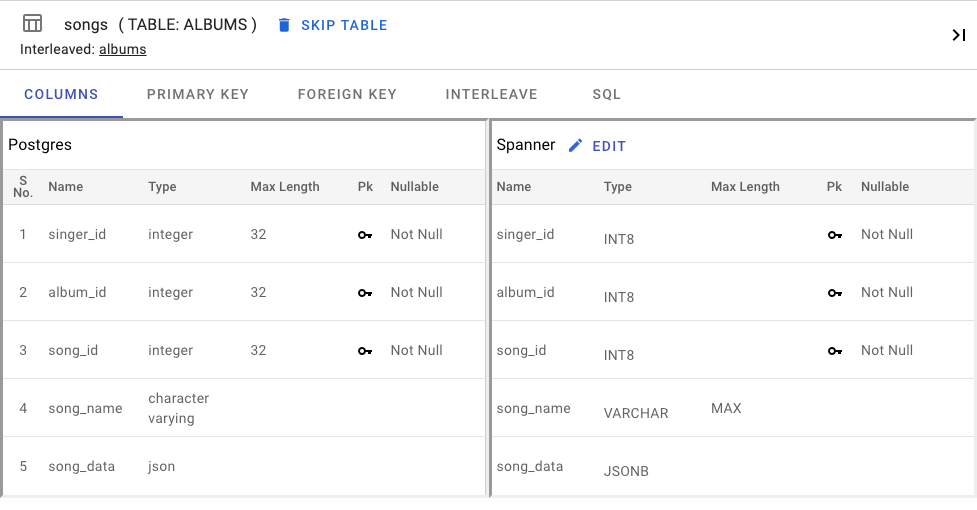
In the "Configure Schema" view, clicking on each table shows the schema for PostgreSQL and Spanner in a side-by-side comparison.

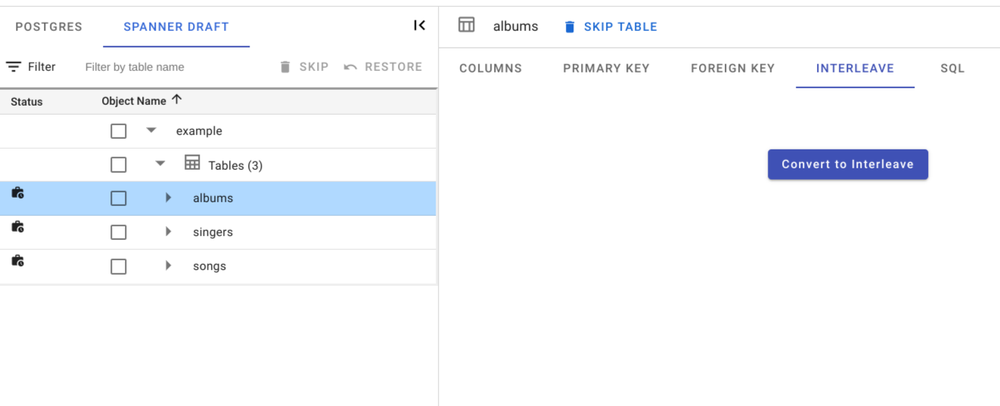
Spanner tables albums and songs can leverage interleaving for better query optimization. This can be done through the “INTERLEAVE” tab.

Next, plan for all the issues displayed by SMT to ensure a smooth migration.
In Spanner all tables need a primary key. The singers table had no primary key, but it had a UNIQUE constraint on singer_id. SMT cleverly migrated that column to be our primary key.

Some columns have SERIAL data types (for IDs). Since Spanner does not support this, we can use SEQUENCEs. Spanner SEQUENCEs are not monotonically increasing to prevent hotspotting. We will need to manually create those later.
Spanner only supports 8 byte integrals, so int4/SERIAL columns were migrated to int8s. They will affect the refactoring of the application later.
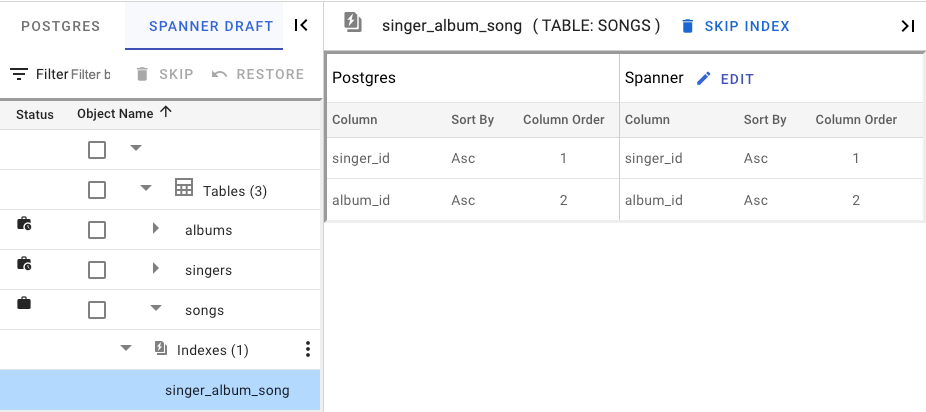
We can remove the identified redundant index by selecting it in the songs table and skipping its creation.

With a plan to solve all issues at hand, save the work by clicking "Save Session". Continue by clicking on “Prepare Migration”.
At first, we will only migrate the Schema to validate our application for Spanner. Enter:
-
Migration mode: Schema
-
Spanner database: example
Click on “Migrate”. We will get a link to the created database on completion.

Finally, apply the schema updates that weren’t automated by SMT. Run statements from this file on the migrated database. You can do it through Spanner Studio.
5. Update application
We needed to do some minor updates to have our application working with Spanner, including:
-
Configuring PGAdapter for converting the PostgreSQL wire-protocol into its Spanner equivalent.
-
Updating queries, because Spanner supports jsonb in lieu of the json type.
You can learn more about these updates here.
To test the application against Spanner, we configure it first:
We then start it:
After verifying that the application has inserted a few rows successfully, we can stop it and delete the sample data.
6. Minimal downtime migration
SMT orchestrates the “Minimal Downtime Migration” process by:
- Loading initial data from the source database into the destination.
- Applying a stream of change data capture (CDC) events.

SMT will set up:
-
Cloud Storage bucket to store CDC events while the initial data loading occurs.
-
Datastream job for bulk loading of CDC data and streaming incremental data to Storage bucket.
-
Dataflow job to migrate CDC events into Spanner.
To allow SMT to deploy this pipeline, make sure you have all the necessary permissions.
Next, follow this guide to set up the source PostgreSQL CDC. You can then restart the application pointing to PostgreSQL to simulate live traffic:
Jump back to the SMT, resume the saved session and continue to “Prepare Migration”. Enter:
-
Migration Mode: Data
-
Migration Type: Minimal downtime Migration.
Input the source PostgreSQL database details (example) and the destination Spanner database (example).
Input the connection profile for the source database (from the PostgreSQL CDC configuration) and follow the IP allowlisting instructions.
Finally, set up the target connection profile and click on “Migrate” to start the migration.

SMT generates useful links for monitoring the migration.
7. Using Spanner
Stop the application that is using PostgreSQL:
Wait for the Spanner to catch up, once Dataflow’s backlog reaches zero, switch to the Spanner application:
With that we successfully completed our demo app migration using SMT!
Now you can click on “End Migration” and clean up the jobs.
Conclusion
Through careful planning and utilizing SMT, we can minimize downtime during the migration to Spanner, ensuring an efficient transition.
 10 months ago
43